官网前端首屏需要播放一个视频,起初前端人员直接使用MP4 文件进行加载,一个视频40M ,每次进入会有较长一段时间白屏。后边讨论后分段加载视频,将视频切割成m3u8 形式,进行流媒体播放。
切分视频 要将MP4视频转换为M3U8格式,你需要使用一些专门处理视频的库,比如ffmpeg(这是一个广泛使用的命令行工具)以及Python包装器如moviepy或者直接调用subprocess来调用ffmpeg命令,或者有一些现成的在线工具。
自己使用FFmpeg 命令去转换,无论怎么操作,都达不到预期效果,远不如在线工具,不知道是使用姿势不对的问题?
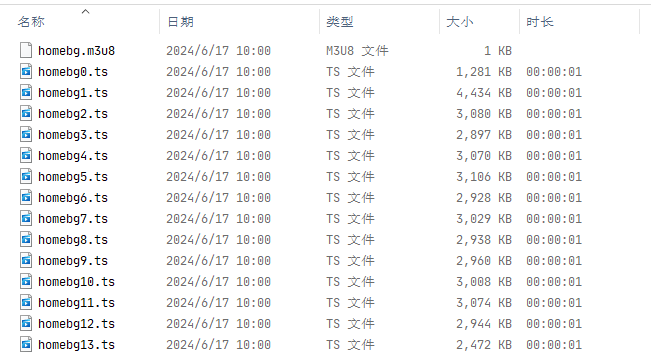
视频转换后生成如下格式的内容
M3U8是一种播放列表文件格式,常用于HTTP Live Streaming(HLS),它允许视频流在不同的质量级别进行分段播放,非常适合网络视频流传输。
在线工具 MP4.to|https://www.mp4.to/m3u8/?lang=zh
FFmpeg 客户端命令直接处理 如果没有设置环境变量,那么只能在系统目录执行
Windows 安装
传统安装
下载并安装FFmpeg :
添加FFmpeg路径到环境变量 :
在Windows上,右键点击“此电脑”或“我的电脑” > “属性” > “高级系统设置” > “环境变量”。
在“系统变量”区域找到名为Path的变量,选择“编辑”。
点击“新建”,然后将FFmpeg的bin目录路径粘贴进去(例如,C:\ffmpeg\bin),确定并关闭所有对话框。
验证FFmpeg安装 :
打开一个新的命令提示符窗口(注意,如果之前已经有一个命令提示符窗口打开,需要重新打开才能识别新的环境变量设置),输入ffmpeg并回车。
如果看到FFmpeg的帮助信息,说明安装和配置成功。
命令行安装
参考文章
Ubuntu 安装
在Ubuntu上安装FFmpeg,您可以使用APT包管理器,这是最直接且常用的方法。以下是安装步骤:
更新软件包列表 :
安装FFmpeg :
如果系统提示您确认安装,按Y键后按Enter键继续。
验证安装 :
如果安装成功,此命令将显示FFmpeg的版本信息。
命令行模式
1
2
3
ffmpeg -i origin.mp4 -c:v copy -c:a copy -segment_time 10 -f segment split %03d.mp4 ffmpeg -i C:\Users\Desktop\homeBG\homeBg.mp4 -profile:v baseline -level 3.0 -s 1920x1080 -start_number 0 -hls_time 1 -hls_list_size 0 -f hls C:\Users\Desktop\homeBG\m3u82\index.m3u8
Python 脚本处理 以下是一个使用Python和subprocess模块调用FFmpeg命令来实现MP4转M3U8的基本示例。请确保你已经安装了FFmpeg并在系统PATH中可以被访问到。
使用 subprocess
查看代码
1
2
3
4
5
6
7
8
9
10
11
12
13
14
15
16
17
18
19
20
21
22
23
24
25
26
27
28
29
30
31
32
33
34
35
36
37
38
39
40
41
42
43
""" 需要本地也全局安装ffmpeg 工具 """ import subprocessdef mp4_to_m3u8 (input_mp4, output_dir ): """ 将MP4视频转换为M3U8格式。 :param input_mp4: 输入的MP4文件路径 :param output_dir: 输出目录,M3U8文件和切片将保存在此目录下 """ output_basename = input_mp4.split('/' )[-1 ].split('.' )[0 ] output_m3u8 = f"{output_dir} /{output_basename} .m3u8" output_ts = f"{output_dir} /{output_basename} %d.ts" cmd = [ "ffmpeg" , "-i" , input_mp4, "-profile:v" , "baseline" , "-level" , "3.0" , "-s" , "640x360" , "-start_number" , "0" , "-hls_time" , "10" , "-hls_list_size" , "0" , "-f" , "hls" , output_ts ] try : subprocess.run(cmd, check=True ) print (f"转换完成,M3U8文件已生成:{output_m3u8} " ) except subprocess.CalledProcessError as e: print (f"转换失败:{e} " ) input_mp4_path = "\mp4\homeBg.mp4" output_directory = "\m3u8\homeBg.m3u8" mp4_to_m3u8(input_mp4_path, output_directory)
使用ffmpeg-python
ffmpeg-python 是一个Python库,它提供了简单的接口来使用FFmpeg,使得在Python脚本中处理视频和音频文件变得更加直接和便捷。相比于直接使用 subprocess 调用FFmpeg命令,ffmpeg-python 提供了更Pythonic的语法,让操作更加直观。不过,请注意,ffmpeg-python 是FFmpeg的一个封装,因此在使用前确保你的系统中已经安装了FFmpeg。
查看代码
1
2
3
4
5
6
7
8
9
10
11
12
13
14
15
16
17
18
19
20
21
22
23
24
25
26
27
28
29
30
31
32
33
34
35
36
37
38
39
40
41
42
43
44
""" 安装依赖 pip install ffmpeg-python """ from ffmpeg import ( FFmpeg, Input, Output ) def mp4_to_m3u8 (input_file, output_folder ): output_name = input_file.stem output_m3u8 = f"{output_folder} /{output_name} .m3u8" output_ts = f"{output_folder} /{output_name} _%03d.ts" ( FFmpeg() .input (Input(input_file)) .output( Output(output_ts, format ='hls' , hls_time=10 , hls_list_size=0 ), map_metadata=0 , movflags='+faststart' , codec:v='libx264' , profile:v='baseline' , level=3.0 , b:v='1000k' , maxrate='1000k' , bufsize='1835k' , s='1920x1080' ) .global_args('-loglevel' , 'error' ) .overwrite_output() .run() ) return output_m3u8 input_mp4_path = "path/to/your/input.mp4" output_directory = "path/to/output/directory" m3u8_playlist = mp4_to_m3u8(input_mp4_path, output_directory) print (f"M3U8 playlist created at: {m3u8_playlist} " )
如果报错
1
2
3
4
5
6
7
8
9
10
11
12
13
PS E:\python\python_demo\aiwen\m3u8> & D:/devsoft/python3/python.exe e:/python/python_demo/aiwen/m3u8/myffmpeg.py Traceback (most recent call last): File "e:\python\python_demo\aiwen\m3u8\myffmpeg.py" , line 40, in <module> mp4_to_m3u8(input_mp4_path, output_directory) File "e:\python\python_demo\aiwen\m3u8\myffmpeg.py" , line 32, in mp4_to_m3u8 subprocess.run(cmd, check=True) File "D:\devsoft\python3\lib\subprocess.py" , line 505, in run with Popen(*popenargs, **kwargs) as process: File "D:\devsoft\python3\lib\subprocess.py" , line 951, in __init__ self._execute_child(args, executable, preexec_fn, close_fds, File "D:\devsoft\python3\lib\subprocess.py" , line 1420, in _execute_child hp, ht, pid, tid = _winapi.CreateProcess(executable, args, FileNotFoundError: [WinError 2] 系统找不到指定的文件。
这个错误提示表明Python在尝试运行FFmpeg命令时找不到ffmpeg可执行文件,这意味着要么FFmpeg没有安装在你的系统上,要么其路径没有被添加到系统的环境变量中,导致Python的subprocess模块无法直接调用它。
前端播放视频 查看代码
1
2
3
4
5
6
7
8
9
10
11
12
13
14
15
16
17
18
19
20
21
22
23
24
25
26
27
28
29
30
<!DOCTYPE html > <html lang ="en" > <head > <meta charset ="UTF-8" > <meta name ="viewport" content ="width=device-width, initial-scale=1.0" > <meta http-equiv ="X-UA-Compatible" content ="ie=edge" > <title > PC HLS video</title > <link href ="http://cdn.bootcss.com/video.js/6.0.0-RC.5/alt/video-js-cdn.min.css" rel ="stylesheet" > </head > <body > <video id ="hls-video" width ="300" height ="200" class ="video-js vjs-default-skin" playsinline webkit-playsinline autoplay controls preload ="auto" muted ="muted" x-webkit-airplay ="true" x5-video-player-fullscreen ="true" x5-video-player-typ ="h5" > <source src ="https://www.xxxxxx.com/video/homeBg/homebg.m3u8" type ="application/x-mpegURL" > </video > <script src ="http://cdn.bootcss.com/video.js/6.0.0-RC.5/video.js" > </script > <script src ="http://cdn.bootcss.com/videojs-contrib-hls/5.3.3/videojs-contrib-hls.js" > </script > <script > var player = videojs ('hls-video' ); player.play (); </script > </body > </html >
参考文章


