Java使用easypoi根据Word模板导出多页文档问题总结
最近新写了一个项目,有个功能点需要根据客户提供的Word文档模板,将后台数据每行一页这样导出到一个Word文档中。
起初是导入到Excel中,后边甲方觉得使用起来,又让改成上边说的那样。
因为项目中使用的是EasyPOI这个 POI的二次封装框架,经查阅资料,发现支持这个功能。
题外话,其实也看了其它现成框架,但好像都不支持,并且一般来说导出 Word的场景也不多,也没有使用模板语言,自己再费劲写个,时间紧迫,最终还是选择了EasyPOI。 SpringBoot整合EasyPOI导出excel插入图片
根据别人的使用经验,操作很简单,现成的方法套模板、填数据就行了,但就是这么简单一个事情儿,确让我差点怀疑人生了。
“不是难,而是预想不到”。
因此、将这个过程遇到的问题记录下来,自己积累经验和替别人踩坑。
完整示例
引入依赖
这里有个大坑,如果使用EasyPOI 需要注意
1
2
3
4
5
6
7
8
9
10
11
12
13
14
15
| <dependency>
<groupId>cn.afterturn</groupId>
<artifactId>easypoi-base</artifactId>
<version>4.3.0</version>
</dependency>
<dependency>
<groupId>cn.afterturn</groupId>
<artifactId>easypoi-web</artifactId>
<version>4.3.0</version>
</dependency>
<dependency>
<groupId>cn.afterturn</groupId>
<artifactId>easypoi-annotation</artifactId>
<version>4.3.0</version>
</dependency>
|
导出工具类
1
2
3
4
5
6
7
8
9
10
11
12
13
14
15
16
17
18
19
20
21
22
23
24
25
26
27
28
29
30
31
32
33
34
35
36
37
38
39
40
41
42
43
44
45
46
47
48
49
50
51
52
53
54
55
56
57
58
59
60
61
62
63
64
65
66
67
68
69
70
71
72
73
74
75
76
77
78
79
80
81
82
83
| package com.example.common.util;
import cn.afterturn.easypoi.entity.ImageEntity;
import cn.afterturn.easypoi.word.parse.ParseWord07;
import com.example.common.handle.exception.FileException;
import org.apache.poi.xwpf.usermodel.XWPFDocument;
import org.slf4j.Logger;
import org.slf4j.LoggerFactory;
import org.springframework.util.ResourceUtils;
import javax.servlet.ServletOutputStream;
import javax.servlet.http.HttpServletResponse;
import java.io.*;
import java.net.URLEncoder;
import java.nio.file.Files;
import java.util.List;
import java.util.Map;
public class WordUtil {
public static final Logger log = LoggerFactory.getLogger(WordUtil.class);
public static void exportWord(HttpServletResponse response, List<Map<String, Object>> dataList, String fileName, String templatePath) {
try {
XWPFDocument doc = new ParseWord07().parseWord(templatePath, dataList);
response.reset();
response.setContentType("application/vnd.openxmlformats-officedocument.wordprocessingml.document");
String dispositionValue = "attachment; filename=" + URLEncoder.encode(fileName, "UTF-8");
response.setHeader("Content-disposition", dispositionValue);
response.setCharacterEncoding("UTF-8");
try (ServletOutputStream responseOutputStream = response.getOutputStream()) {
doc.write(responseOutputStream);
}
} catch (Exception e) {
e.printStackTrace();
throw new FileException("word 文件导出失败", 500);
}
}
public static void exportWordToFile(List<Map<String, Object>> dataList, String fileName, String templatePath) {
try {
XWPFDocument doc = new ParseWord07().parseWord(templatePath, dataList);
OutputStream stream = Files.newOutputStream(new File(fileName).toPath());
doc.write(stream);
stream.flush();
stream.close();
doc.close();
} catch (Exception e) {
e.printStackTrace();
throw new FileException("word 文件导出失败", 500);
}
}
public static ImageEntity writeImage(String url) {
ImageEntity imageEntity = new ImageEntity();
imageEntity.setUrl(url);
imageEntity.setWidth(180);
imageEntity.setHeight(80);
imageEntity.setLocationType(ImageEntity.EMBED);
imageEntity.setColspan(1);
imageEntity.setRowspan(1);
return imageEntity;
}
}
|
测试
1
2
3
4
5
6
7
8
9
10
11
12
13
14
15
| @PostMapping("/word")
@ApiOperation(value = "导出Word")
public void export2Word(@RequestBody ExportVO exportVO, HttpServletResponse response) {
String templatePath = filePath + /template/word.docx";
// 数据自己构造,需要将实体类转化为map, ,可以借助 对象转Map工具去做
List<Map<String, Object>> exportMapList = expoerService.exportByExample(exportVO);
if (exportMapList.isEmpty()) {
throw new FileException("没有要导出的数据");
}
String filename = "导出文件名称-" + DateUtil.format(new Date(), "yyyyMMddHHmmss") + ".docx";
WordUtil.exportWord(response, exportMapList, filename, templatePath);
}
|
问题总结复盘
其实网上关于如何使用EasyPOI导出Word的教程,还是蛮多的,本文的重点也不在这里。总结本文的目的主要是记录问题,避坑。
同样使用别人写好的教程,为什么我导出的Word总是乱码?
因为这个问题,我翻阅了大量的教程,把人家写好的例子拿来用,我的依旧乱码。最后我都怀疑人生了。并且我换了一种方式,通过本地文件流的形式,将文件导出到本地,本地文档也没有问题。
因为本地文件没有问题,Response 流导出有问题,一直定位是导出的文件编码有问题,尝试了各种方式,都没用。
最终,这个问题是怎么解决的,有时候还真不是代码的问题,因为项目中使用了 knife4j 作为接口文档联调工具,我一直使用这个玩意去测试导出,能导出,但是就是乱码了,具体原因我还没去看。
实在没办法,我把接口换成GET 请求,浏览器直接导出下载,导出的Word 文档没有乱码。后边我又试了试 ApiFox 也没有问题。
总结:导出文件的时候最好不要用knife4j测试,先用浏览器测试一下,避免位置的坑。
导出Word 文档中的图片,为什么总是和第一页一样?
简单来说,这是一个EasyPOI的一个 BUG,之前别人也提过issue,但是都没解决。因此需要解决这个问题,两种方式:
换种导出方式
修改EasyPOI的BUG
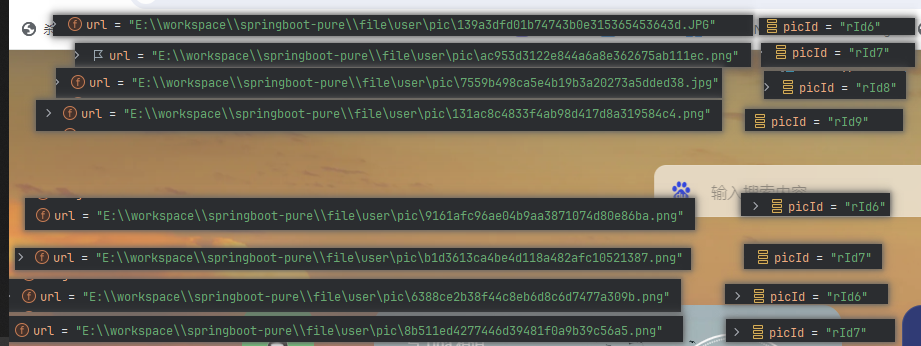
首先,为什么会出现这个问题呢? 通过debug源码查看
1
2
3
4
5
6
7
8
9
10
|
public static XWPFDocument exportWord07(String url, List<Map<String, Object>> list) throws Exception {
return new ParseWord07().parseWord(url, list);
}
|
1
2
3
4
5
6
7
8
9
10
11
12
13
14
15
16
17
18
19
20
21
22
23
24
25
26
27
28
29
30
31
32
33
34
35
36
37
38
39
40
41
42
43
|
public XWPFDocument parseWord(String url, Map<String, Object> map) throws Exception {
MyXWPFDocument doc = WordCache.getXWPFDocument(url);
parseWordSetValue(doc, map);
return doc;
}
public XWPFDocument parseWord(String url, List<Map<String, Object>> list) throws Exception {
if (list == null || list.size() == 0) {
return null;
} else if (list.size() == 1) {
return parseWord(url, list.get(0));
} else {
MyXWPFDocument doc = WordCache.getXWPFDocument(url);
parseWordSetValue(doc, list.get(0));
doc.createParagraph().setPageBreak(true);
for (int i = 1; i < list.size(); i++) {
MyXWPFDocument tempDoc = WordCache.getXWPFDocument(url);
parseWordSetValue(tempDoc, list.get(i));
tempDoc.createParagraph().setPageBreak(true);
doc.getDocument().addNewBody().set(tempDoc.getDocument().getBody());
}
return doc;
}
}
|
1
2
3
4
5
6
7
8
9
10
11
12
13
14
15
16
17
18
19
20
21
22
23
24
25
26
27
28
29
30
31
32
33
34
35
36
37
38
39
40
41
42
43
44
| public class ParseWord07 {
private static final Logger LOGGER = LoggerFactory.getLogger(ParseWord07.class);
private void changeValues(XWPFParagraph paragraph, XWPFRun currentRun, String currentText,
List<Integer> runIndex, Map<String, Object> map) throws Exception {
if (currentText.contains(FOREACH) && currentText.startsWith(START_STR)) {
currentText = currentText.replace(FOREACH, EMPTY).replace(START_STR, EMPTY).replace(END_STR, EMPTY);
String[] keys = currentText.replaceAll("\\s{1,}", " ").trim().split(" ");
List list = (List) PoiPublicUtil.getParamsValue(keys[0], map);
list.forEach(obj -> {
if (obj instanceof ImageEntity) {
currentRun.setText("", 0);
ExcelMapParse.addAnImage((ImageEntity) obj, currentRun);
} else {
PoiPublicUtil.setWordText(currentRun, obj.toString());
}
});
} else {
Object obj = PoiPublicUtil.getRealValue(currentText, map);
if (obj instanceof ImageEntity) {
currentRun.setText("", 0);
ExcelMapParse.addAnImage((ImageEntity) obj, currentRun);
} else {
currentText = obj.toString();
PoiPublicUtil.setWordText(currentRun, currentText);
}
}
for (int k = 0; k < runIndex.size(); k++) {
paragraph.getRuns().get(runIndex.get(k)).setText("", 0);
}
runIndex.clear();
}
}
|
1
2
3
4
5
6
7
8
9
10
11
12
13
14
15
16
17
18
19
20
21
22
23
24
25
26
27
28
29
30
31
32
33
34
35
36
37
38
39
40
41
42
43
44
45
46
47
48
49
50
|
public final class ExcelMapParse {
private static final Logger LOGGER = LoggerFactory.getLogger(ExcelMapParse.class);
public static void addAnImage(ImageEntity obj, XWPFRun currentRun) {
try {
Object[] isAndType = PoiPublicUtil.getIsAndType(obj);
String picId;
picId = currentRun.getDocument().addPictureData((byte[]) isAndType[0],
(Integer) isAndType[1]);
if (obj.getLocationType() == ImageEntity.EMBED) {
((MyXWPFDocument) currentRun.getDocument()).createPicture(currentRun,
picId, currentRun.getDocument()
.getNextPicNameNumber((Integer) isAndType[1]),
obj.getWidth(), obj.getHeight());
} else if (obj.getLocationType() == ImageEntity.ABOVE) {
((MyXWPFDocument) currentRun.getDocument()).createPicture(currentRun,
picId, currentRun.getDocument()
.getNextPicNameNumber((Integer) isAndType[1]),
obj.getWidth(), obj.getHeight(), false);
} else if (obj.getLocationType() == ImageEntity.BEHIND) {
((MyXWPFDocument) currentRun.getDocument()).createPicture(currentRun,
picId, currentRun.getDocument()
.getNextPicNameNumber((Integer) isAndType[1]),
obj.getWidth(), obj.getHeight(), true);
}
} catch (Exception e) {
LOGGER.error(e.getMessage(), e);
}
}
}
|

修复方式只要保证生成Word中的图片picId 全局唯一就可以了。 解决方式如下
- 修改对象
ParseWord07 ,初始化为第一页 MyXWPFDocument 对象为静态。
1
2
3
4
5
6
7
8
9
10
11
12
13
14
15
16
17
18
19
20
21
22
23
24
25
26
27
28
29
30
31
32
33
34
35
36
37
38
39
40
41
42
43
44
45
46
|
public static MyXWPFDocument DOC = null;
public XWPFDocument parseWord(String url, Map<String, Object> map) throws Exception {
DOC = WordCache.getXWPFDocument(url);
parseWordSetValue(DOC, map);
return DOC;
}
public XWPFDocument parseWord(String url, List<Map<String, Object>> list) throws Exception {
if (list == null || list.size() == 0) {
return null;
} else if (list.size() == 1) {
return parseWord(url, list.get(0));
} else {
DOC = WordCache.getXWPFDocument(url);
parseWordSetValue(DOC, list.get(0));
DOC.createParagraph().setPageBreak(true);
for (int i = 1; i < list.size(); i++) {
MyXWPFDocument tempDoc = WordCache.getXWPFDocument(url);
parseWordSetValue(tempDoc, list.get(i));
tempDoc.createParagraph().setPageBreak(true);
DOC.getDocument().addNewBody().set(tempDoc.getDocument().getBody());
}
return DOC;
}
}
|
- 计算图片
picId,使用初始化的对象 MyXWPFDocument,其余不变
1
2
3
4
5
6
7
8
9
10
11
12
13
14
15
16
17
18
19
20
21
22
23
24
25
26
27
28
29
30
31
32
33
34
35
36
37
38
39
40
|
public static void addAnImage(ImageEntity obj, XWPFRun currentRun) {
try {
Object[] isAndType = PoiPublicUtil.getIsAndType(obj);
String picId;
picId = ParseWord07.DOC.addPictureData((byte[]) isAndType[0],
(Integer) isAndType[1]);
if (obj.getLocationType() == ImageEntity.EMBED) {
((MyXWPFDocument) currentRun.getDocument()).createPicture(currentRun,
picId, currentRun.getDocument()
.getNextPicNameNumber((Integer) isAndType[1]),
obj.getWidth(), obj.getHeight());
} else if (obj.getLocationType() == ImageEntity.ABOVE) {
((MyXWPFDocument) currentRun.getDocument()).createPicture(currentRun,
picId, currentRun.getDocument()
.getNextPicNameNumber((Integer) isAndType[1]),
obj.getWidth(), obj.getHeight(), false);
} else if (obj.getLocationType() == ImageEntity.BEHIND) {
((MyXWPFDocument) currentRun.getDocument()).createPicture(currentRun,
picId, currentRun.getDocument()
.getNextPicNameNumber((Integer) isAndType[1]),
obj.getWidth(), obj.getHeight(), true);
}
} catch (Exception e) {
LOGGER.error(e.getMessage(), e);
}
}
|
重新 maven 构建源码,就可以使用了。


